div[data-widget-id=”1676364″] { min-height: 300px; }
Fall is the perfect time to switch up your nail style and embrace the warm, cozy vibe of sweater weather. Sweater nails are a popular trend that mimics the look of knitwear on nails, offering a unique, textured appearance that’s perfect for the season. Whether you prefer subtle designs or bold designs, there’s a sweater nail look for everyone. Let’s dive into some of the most stunning sweater nail designs you can try this season.
Cozy orange knit fabric
Orange is the quintessential autumn color, and this cozy orange knit nail design is perfect for embracing the autumn spirit. The matte finish gives it a soft, velvety look, while the intricate 3D patterns add a touch of elegance. The texture mimics the look of a classic cable knit sweater, making your nails look chic and comfortable.
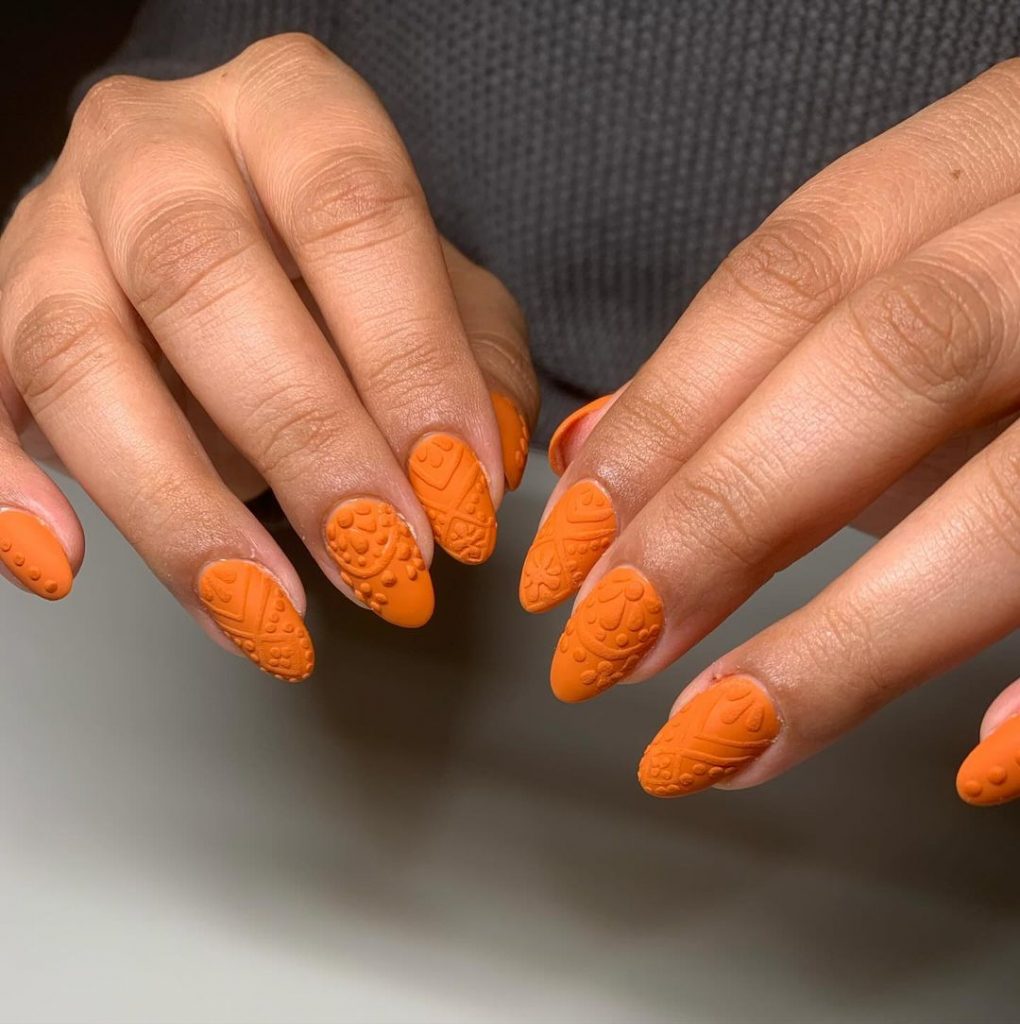 Photo credit: @jocelyns.nail.bar
Consumables:
Matte orange nail polish (e.g. “Fall for NYC” by Essie)
3D nail art gel (e.g. Born Pretty 3D Sculpting Gel)
Dotting Tool and Fine Brush for Nail Art
UV/LED curing lamp
DIY Instructions:
Start with a base coat to protect your nails.
Apply two coats of matte orange nail polish and let it dry completely.
Using 3D nail art gel, create weave patterns by drawing lines and dots with a dotting tool and a fine brush.
Cure the design under UV/LED lamp.
Seal with a matte top coat for a long lasting finish.
Funny cartoon characters
This nail design features adorable cartoon characters combined with textured sweater patterns. The combination of warm brown tones with playful illustrations makes this a fun and unique option for fall. It’s perfect for those who love to add a bit of whimsy to their nail art.
 Photo credit: @naillartz_bycynthia
Consumables:
Nude and brown nail polishes (e.g. OPI “Bare My Soul” and “Chocolate Moose”)
3D textured nail gel
Nail art stickers or hand painting tools for characters.
Fine nail art brush and dotting tool
DIY Instructions:
Apply a base coat to protect your nails.
Paint your nails with nude and brown base polishes.
Use 3D nail art gel to create sweater patterns on selected nails.
Add cartoon characters using nail stickers or paint them by hand with a fine brush.
Cure the designs under a UV/LED lamp.
Finish with a glossy top coat to enhance the design.
Autumn leaves and glitter
Capture the essence of fall with this nail design that combines autumn leaves and glitter. The combination of clear, glitter, and orange tips creates a dynamic and festive look. The textured elements of the design mimic the feel of fallen leaves and add a seasonal touch to your manicure.
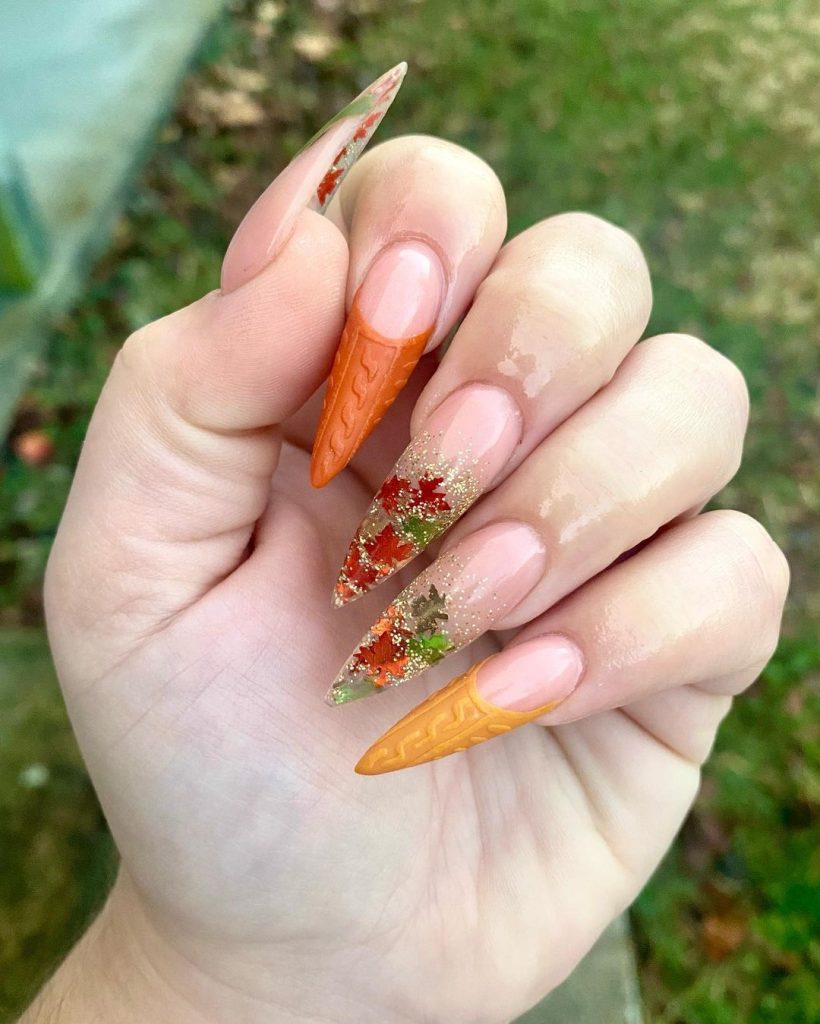 Photo credit: @nailsbestnails
Consumables:
Clear and orange nail polishes (e.g. Sally Hansen’s “Big Shiny Top Coat” and Essie’s “Playing Koi”)
Autumn leaves nail decals or stickers
Fine glitter in autumn colours
3D Nail Gel for Textured Tips
UV/LED curing lamp
DIY Instructions:
Start with a clear base coat.
Apply a clear polish and let it dry.
Use 3D nail art gel to create textured orange tips.
Apply the fall leaf decals or stickers to the clear section of your nails.
Add fine glitter over decals for extra sparkle.
Cure the design under UV/LED lamp.
Seal with a clear top coat to finish.
The perfection of the paintings
Checkered nails are a fall classic and this design brings a touch of sophistication to your manicure. The checkered print in shades of brown and navy creates a timeless look that’s perfect for any fall occasion. The clean lines and subtle colors make it a versatile design that pairs well with any outfit.
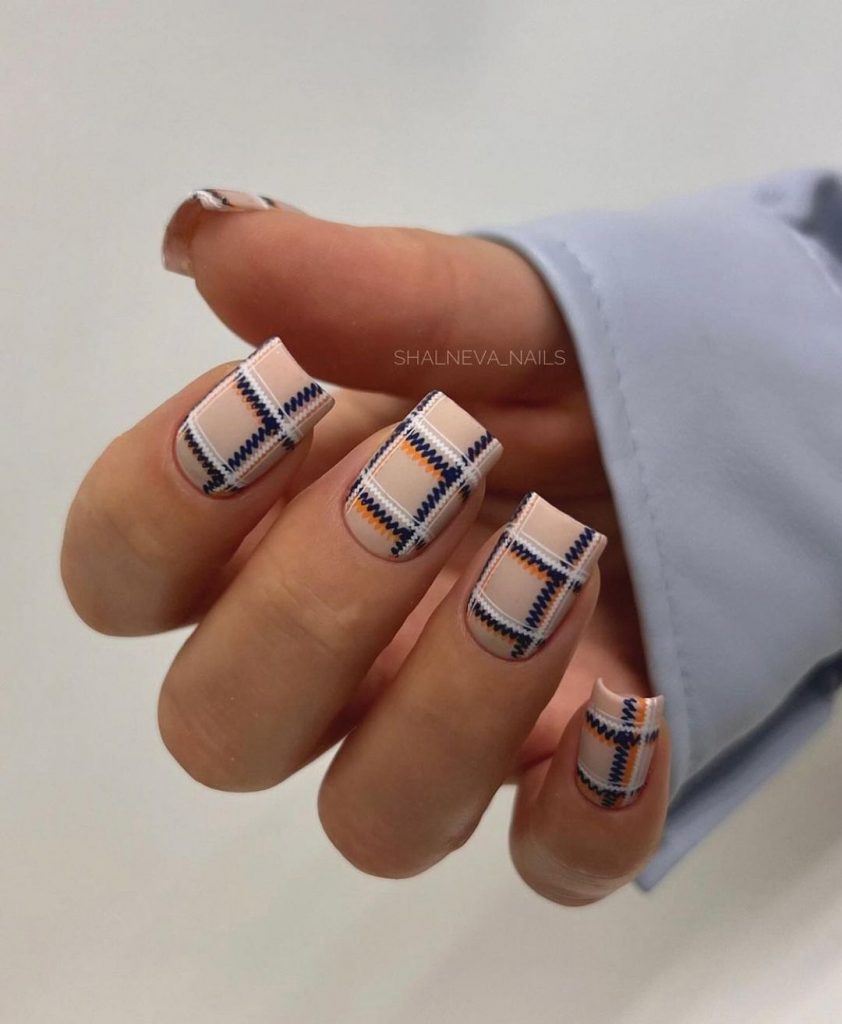 Photo credit: @polakierowana_klaudia.gagracz
Consumables:
Nail polishes in nude, brown and navy shades (e.g. OPI “Dulce de Leche,” Essie “Wicked,” and OPI “Less is Norse”)
Fine brush for nail art
Striping tape for precise lines
UV/LED curing lamp
DIY Instructions:
Apply a base coat to protect your nails.
Paint your nails with the nude polish as a base color and let it dry.
Use striped tape to create a checkered pattern with brown and navy blue polishes.
Carefully paint the lines using a fine nail brush.
Cure the design under UV/LED lamp.
Finish with a clear top coat to seal the design and add shine.
Fun at the pumpkin patch
Celebrate the harvest season with this pumpkin patch-inspired nail design. The combination of green, orange, and plaid patterns evokes the charm of a fall day at a pumpkin patch. This cute and fun design is perfect for adding a touch of seasonal fun to your nails.
 Photo credit: @polakierowana_klaudia.gagracz
Consumables:
Green, orange and white nail polishes (e.g. OPI “Jade is the New Black,” Essie “Tangerine Tease,” and OPI “Alpine Snow”)
Fine nail art brush and dotting tool
Pumpkin nail stickers
UV/LED curing lamp
DIY Instructions:
Start with a base coat to protect your nails.
Paint your nails with green polish as a base color.
Create checkered patterns using the orange and white polishes with a thin nail brush.
Add pumpkin stickers to accentuate your nails and give them a festive touch.
Cure the design under UV/LED lamp.
Seal with a clear top coat to finish.
Geometric autumn design
This geometric fall nail design is perfect for those who love a modern twist on classic fall colors. The combination of mustard yellow, teal, and brown hues with intricate geometric patterns creates a striking yet sophisticated look. The almond shape of the design adds elegance, while the mix of matte and glossy finishes provides depth and dimension.
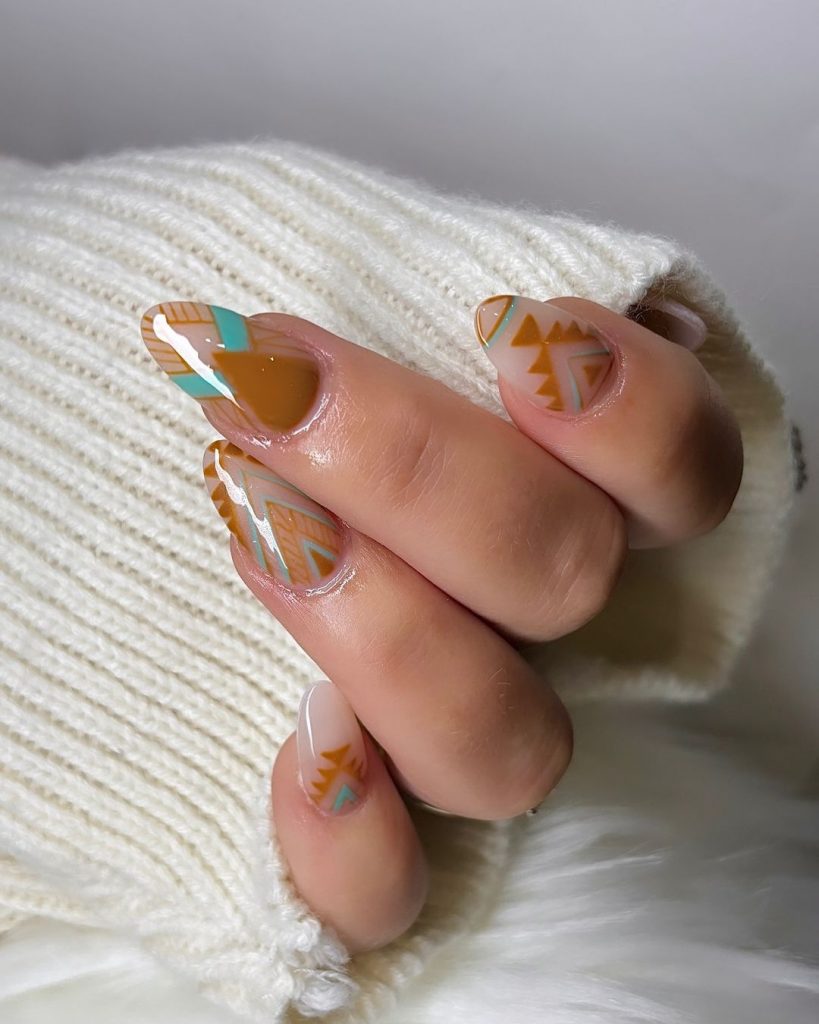 Photo credit: @serenitynailcnspa
Consumables:
Mustard yellow, teal and brown nail polishes (e.g. Zoya “Dacey”, Essie “Aruba Blue”, OPI “Coca-Cola Red”)
Fine nail art brushes for added precision.
Matte top coat and glossy top coat
Striping tape for clean lines
UV/LED curing lamp
DIY Instructions:
Start with a base coat to protect your nails.
Paint your nails with a mustard yellow base color.
Use striped tape to create geometric patterns and fill them in with teal and brown polishes.
Carefully remove the striped tape.
Add a mix of matte and gloss top coats for a textured finish.
Cure the design under UV/LED lamp to set it.
Mustard yellow sweater effect nails
Embrace the warm and cozy vibes of fall with these mustard yellow sweater nails. The matte finish and 3D knit patterns give these nails a unique texture that perfectly mimics the look of a cozy sweater. The almond shape adds a touch of elegance, making this design both chic and comfortable.
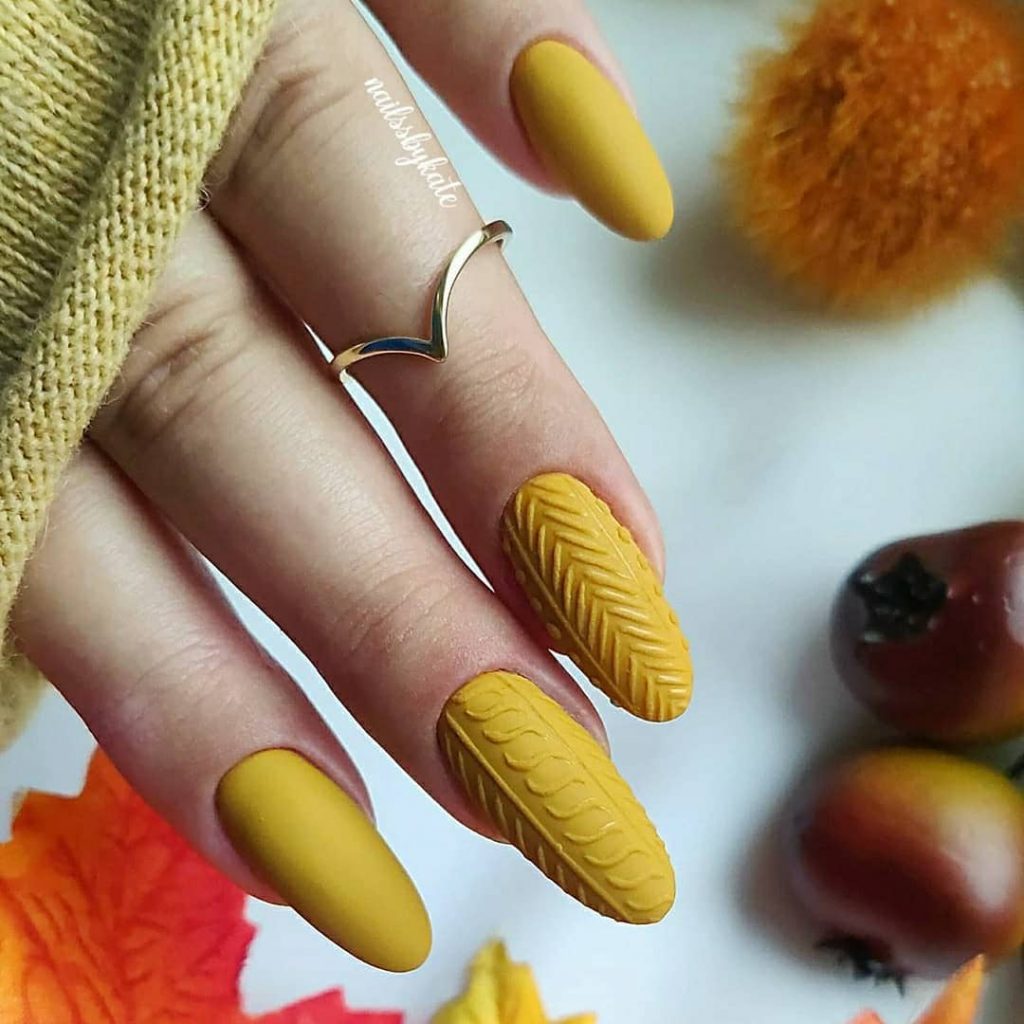 Photo credit: @omega__nails
Consumables:
Matte mustard yellow nail polish (e.g. Essie “Hay There”)
3D nail gel for texture (e.g. Born Pretty 3D Sculpting Gel)
Dotting Tool and Fine Brush for Nail Art
UV/LED curing lamp
DIY Instructions:
Apply a base coat to protect your nails.
Paint your nails with two coats of matte mustard yellow nail polish.
Use 3D nail art gel to create weave patterns with a dotting tool and a fine brush.
Cure the design under UV/LED lamp.
Finish with a matte top coat to seal and protect the design.
Sage green woven nails
These sage green woven nails are perfect for those who love a subtle yet elegant style. The light green hue combined with intricate woven patterns creates a soft and elegant look. The combination of glossy and matte finishes adds depth to the design, making it perfect for any fall occasion.
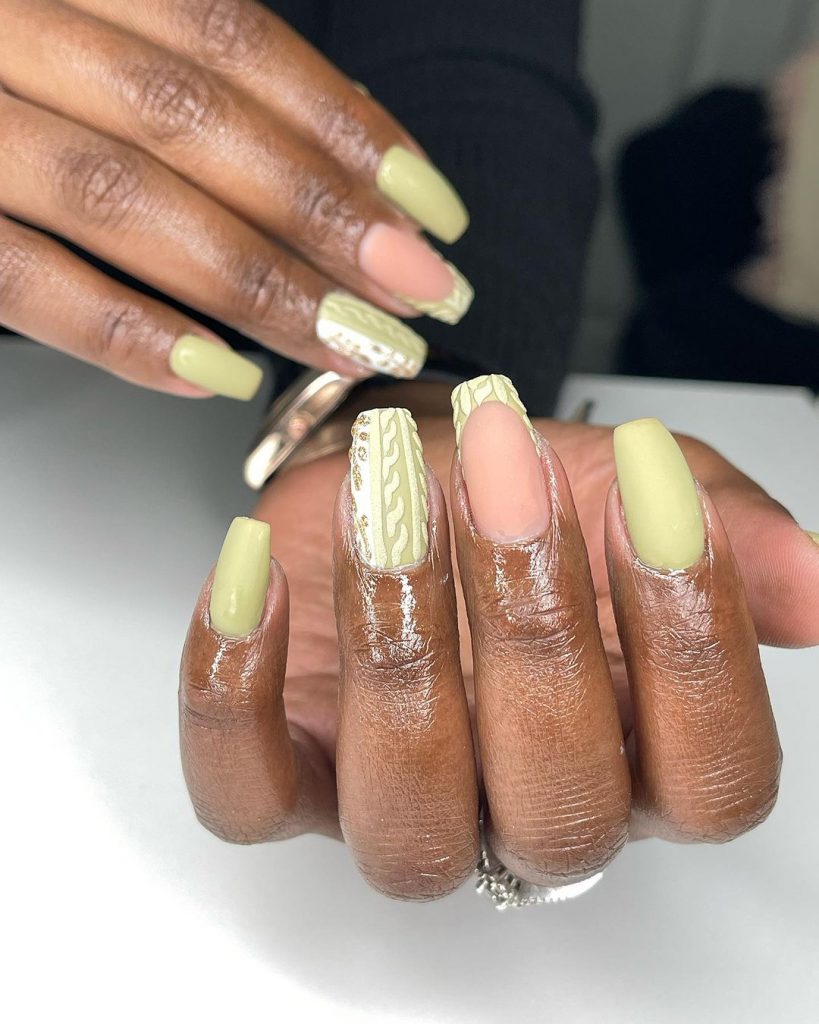 Photo credit: @mamixnails
Consumables:
Sage green nail polish (e.g. OPI “Sage is the Rage”)
3D nail gel for texture (e.g. Born Pretty 3D Sculpting Gel)
Dotting Tool and Fine Brush for Nail Art
UV/LED curing lamp
DIY Instructions:
Start with a base coat to protect your nails.
Apply two coats of sage green nail polish and let it dry completely.
Use 3D nail art gel to create weave patterns with a dotting tool and a fine brush.
Cure the design under UV/LED lamp.
Apply a mix of matte and gloss top coats to add texture.
Nails with pink and burgundy bows
This nail design combines the elegance of burgundy with the sweetness of pink bows. The intricate patterns and 3D bows add a fun and sophisticated touch. The use of rhinestones and pearls further enhances the luxurious feel of this manicure, making it perfect for special occasions.
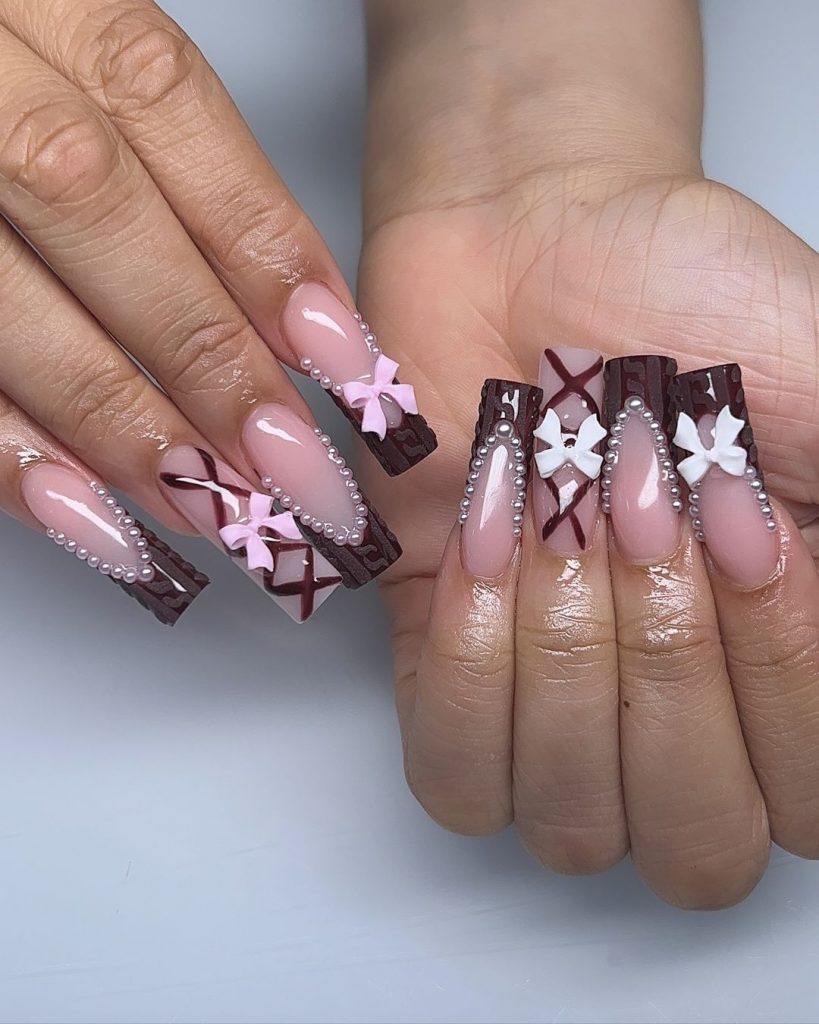 Photo credit: @nicollenailedit_
Consumables:
Burgundy and pink nail polishes (e.g., Essie’s “Berry Naughty” and OPI’s “Mod About You”)
3D nail gel for texture (e.g. Born Pretty 3D Sculpting Gel)
Small rhinestones and pearls
Fine nail art brush and dotting tool
UV/LED curing lamp
DIY Instructions:
Apply a base coat to protect your nails.
Paint your nails with burgundy and pink nail polishes, alternating the colors on each nail.
Use 3D nail art gel to create bow patterns and other intricate designs.
Add rhinestones and pearls for a touch of glamour.
Cure the design under UV/LED lamp.
Finish with a clear top coat to seal the design.
Cable stitch nails in nude and glitter tones
These nude and glitter cable knit nails combine the elegance of a nude base with the sparkle of glitter. The intricate cable knit patterns add texture and depth, while the glitter details add a festive touch. This design is perfect for the holiday season and offers a chic and stylish look.
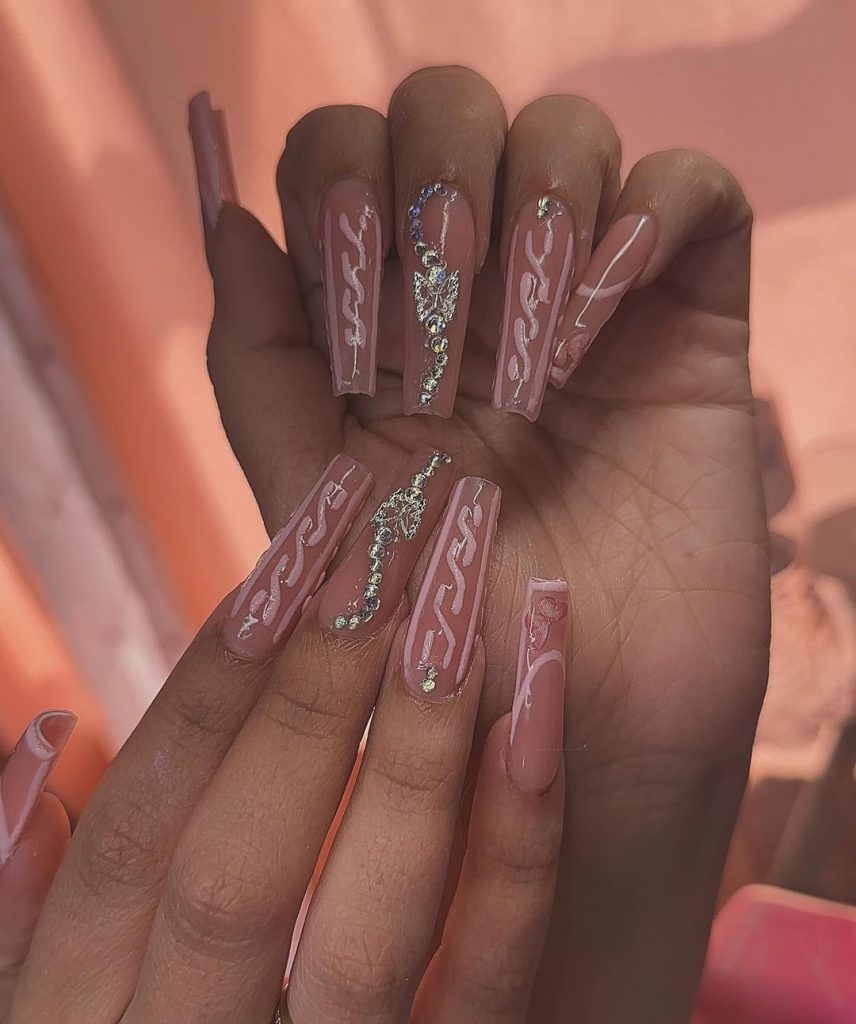 Photo credit: @nicollenailedit_
Consumables:
Nude nail polish (e.g. OPI “Samoan Sand”)
3D nail gel for texture (e.g. Born Pretty 3D Sculpting Gel)
Fine glitter in silver or gold.
Dotting Tool and Fine Brush for Nail Art
UV/LED curing lamp
DIY Instructions:
Apply a base coat to protect your nails.
Paint your nails with two coats of nude polish and let it dry completely.
Use 3D nail art gel to create cable stitch patterns with a dotting tool and a fine brush.
Add fine glitter accents to the design.
Cure the design under UV/LED lamp.
Finish with a clear top coat to seal and protect the design.
Mixed Autumn Nail Design
This mixed fall nail design features a beautiful combination of burgundy, orange, and bright gold hues, creating a warm and festive look. Each nail features a different design, from 3D wire patterns to autumn leaf decals and glitter details, making this manicure both elegant and intricate.
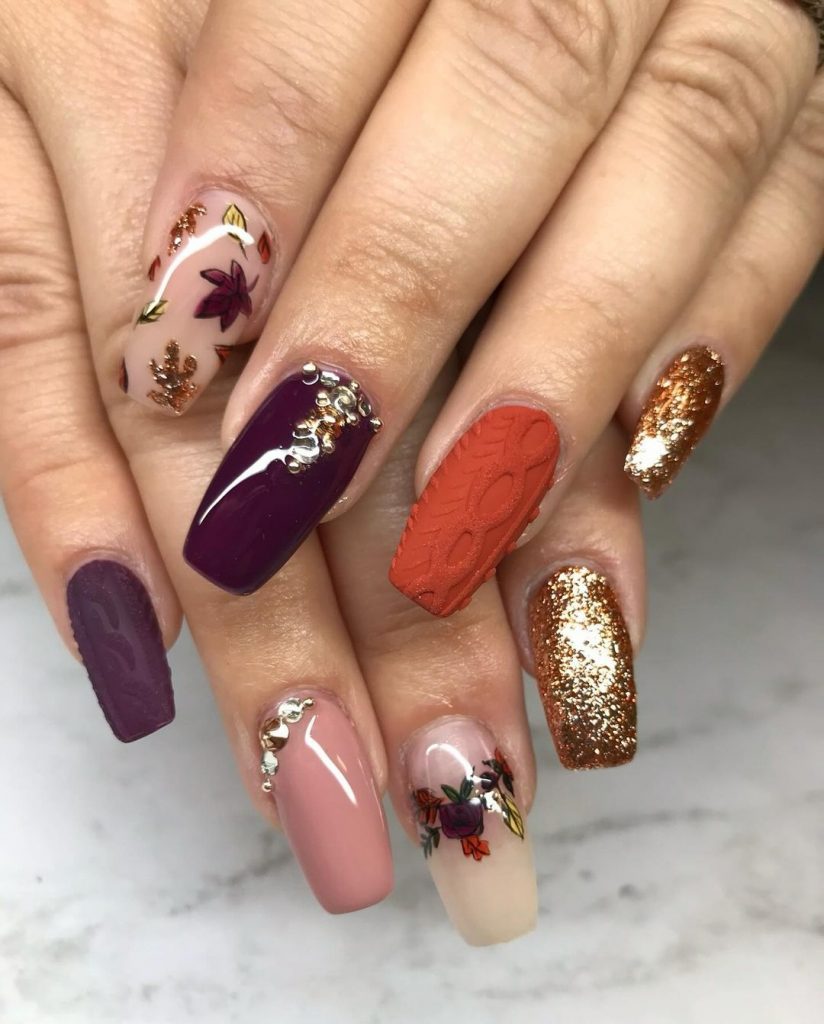 Photo credit: @handjobsbyallison
Consumables:
Nail polishes in burgundy, orange and nude shades (e.g. “Sole Mate” by Essie, “It’s a Piazza Cake” by OPI, “Bare Dare” by Sally Hansen)
3D nail gel for texture (e.g. Born Pretty 3D Sculpting Gel)
Autumn leaf nail decals
Fine glitter in gold
Dotting Tool and Fine Brush for Nail Art
UV/LED curing lamp
DIY Instructions:
Apply a base coat to protect your nails.
Paint your nails with the base colors burgundy, orange and nude, alternating on each nail.
Use 3D nail art gel to create cable weave patterns on selected nails.
Apply fall leaf decals on nude nails and add fine glitter to burgundy nails for a festive touch.
Cure the design under UV/LED lamp.
Seal with a clear top coat to finish and protect the design.
Autumn paintings and leaves
This nail design brings the essence of fall with a mix of plaid patterns and delicate leaf designs. Brown and orange hues, combined with matte finishes, create a cozy and warm look perfect for the fall season. The detailed art on each nail adds a touch of sophistication and elegance.
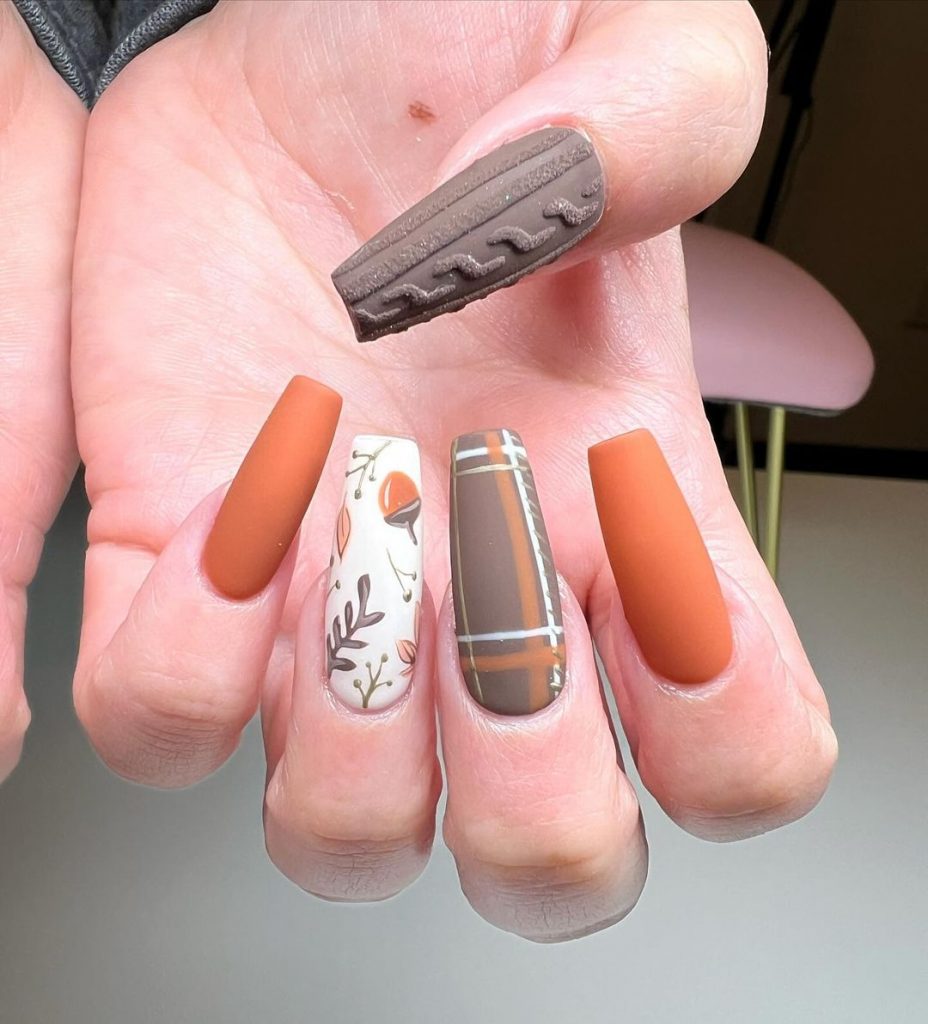 Photo credit: @handjobsbyallison
Consumables:
Brown, orange, and white nail polishes (e.g., Essie’s “Little Brown Dress,” OPI’s “It’s a Piazza Cake,” Zoya’s “Purity”)
Matte top coat
Fine nail art brushes for added precision.
Nail art decals with leaves
UV/LED curing lamp
DIY Instructions:
Start with a base coat to protect your nails.
Paint your nails with the base colors brown, orange and white, alternating on each nail.
Use fine nail art brushes to create checkered patterns and delicate leaf designs.
Apply a matte top coat for a smooth finish.
Cure the design under UV/LED lamp.
Seal with a clear top coat to protect the design.
Pink and gold leaf sweater design nails
These gold and pink leaf design nails combine the softness of pink with the glamour of gold glitter and delicate leaf designs. Cable knit patterns add a cozy texture, making this design perfect for fall. Glittery tips and intricate details make this manicure stand out.
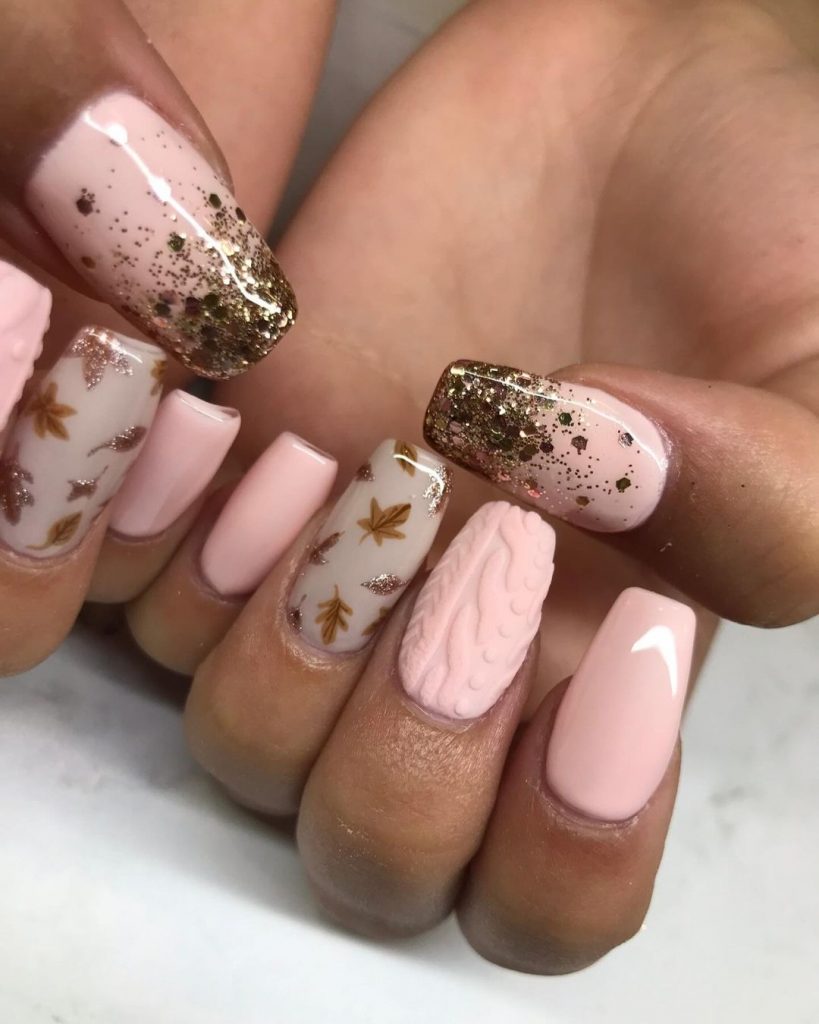 Photo credit: @handjobsbyallison
Consumables:
Pink nail polish (e.g. OPI “Mod About You”)
3D nail gel for texture (e.g. Born Pretty 3D Sculpting Gel)
Golden shine
Leaf shaped nail decals
Dotting Tool and Fine Brush for Nail Art
UV/LED curing lamp
DIY Instructions:
Apply a base coat to protect your nails.
Paint your nails with two coats of pink polish and let it dry completely.
Use 3D nail art gel to create cable weave patterns on selected nails.
Apply gold glitter to the tips of your nails for a festive touch.
Add leaf decals on nude nails.
Cure the design under UV/LED lamp.
Seal with a clear top coat to finish and protect the design.
Autumn nails with floral and woven motifs
This fall nail design with floral and woven motifs combines deep teal and orange with delicate floral patterns, creating a striking contrast. The combination of matte and glossy finishes, along with 3D cable knit textures, gives this manicure a sophisticated and cozy look, perfect for fall.
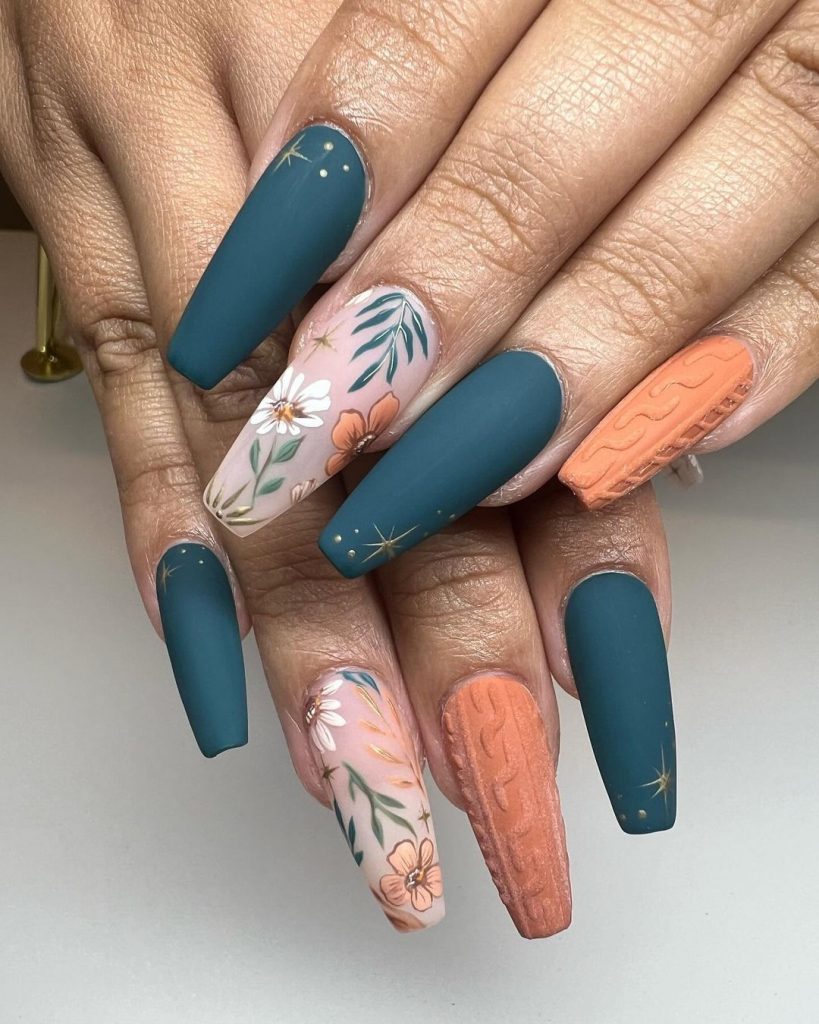 Photo credit: @handjobsbyallison
Consumables:
Nail polishes in teal, orange, and nude shades (e.g., OPI’s “Suzi Says Feng Shui,” Essie’s “Playing Koi,” Sally Hansen’s “Bare Dare”)
3D nail gel for texture (e.g. Born Pretty 3D Sculpting Gel)
Floral nail art decals
Fine nail art brushes for added precision.
UV/LED curing lamp
DIY Instructions:
Start with a base coat to protect your nails.
Paint your nails with the base colors teal, orange and nude, alternating on each nail.
Use 3D nail art gel to create cable weave patterns on selected nails.
Apply floral decals on nude nails and use fine brushes to add details.
Cure the design under UV/LED lamp.
Seal with a clear top coat to finish and protect the design.
Autumn sweater effect nails in pastel tones
These pastel fall nails combine soft shades of blue, pink, and lavender with intricate dot patterns and delicate leaf designs. The combination of matte and glossy finishes adds depth and dimension to the design, making it perfect for a subtle yet chic fall manicure.
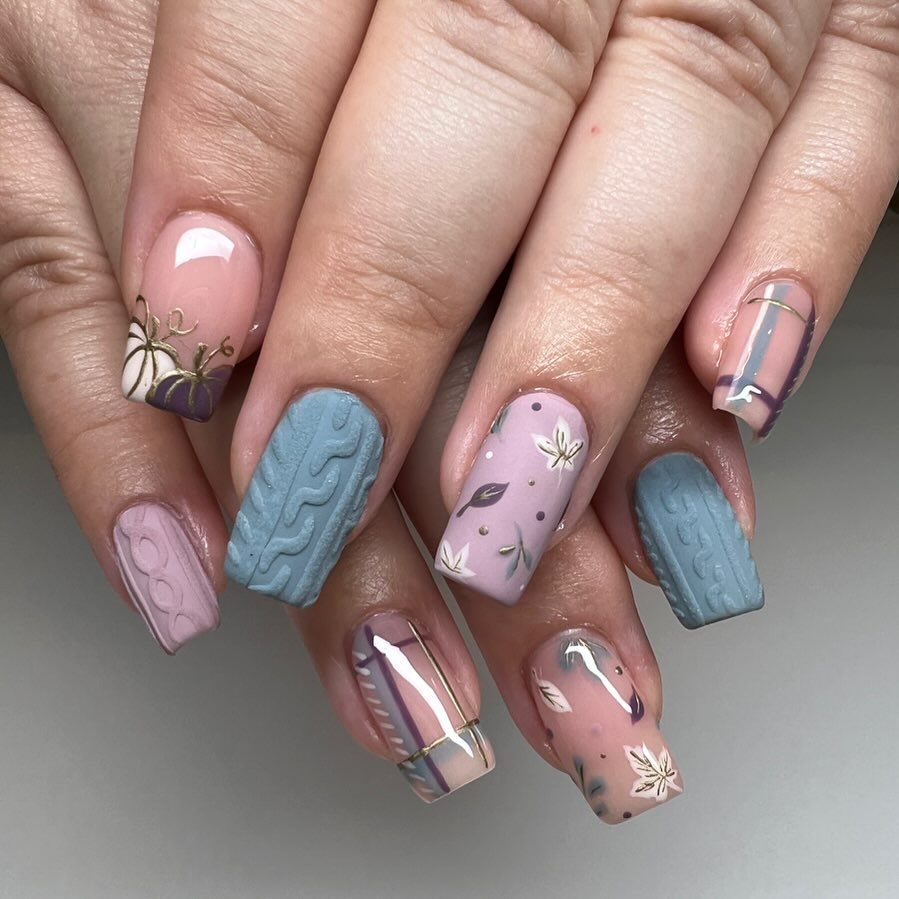 Photo credit: @handjobsbyallison
Consumables:
Pastel blue, pink, and lavender nail polishes (e.g., “Bikini So Teeny” by Essie, “Mod About You” by OPI, “Dot” by Zoya)
3D nail gel for texture (e.g. Born Pretty 3D Sculpting Gel)
Leaf shaped nail decals
Fine nail art brushes for added precision.
UV/LED curing lamp
DIY Instructions:
Apply a base coat to protect your nails.
Paint your nails with the base colors pastel blue, pink and lavender, alternating on each nail.
Use 3D nail art gel to create cable weave patterns on selected nails.
Apply leaf decals on nude nails and use fine brushes to add details.
Cure the design under UV/LED lamp.
Seal with a clear top coat to finish and protect the design.
Blue and beige sweater effect nails
This chic blue and beige sweater nail design combines the tranquility of blue with the sophistication of beige. Intricate cable knit patterns, gold accents, and delicate leaf designs make this manicure perfect for any fall occasion. The combination of matte and glossy finishes adds a touch of luxury to this cozy look.
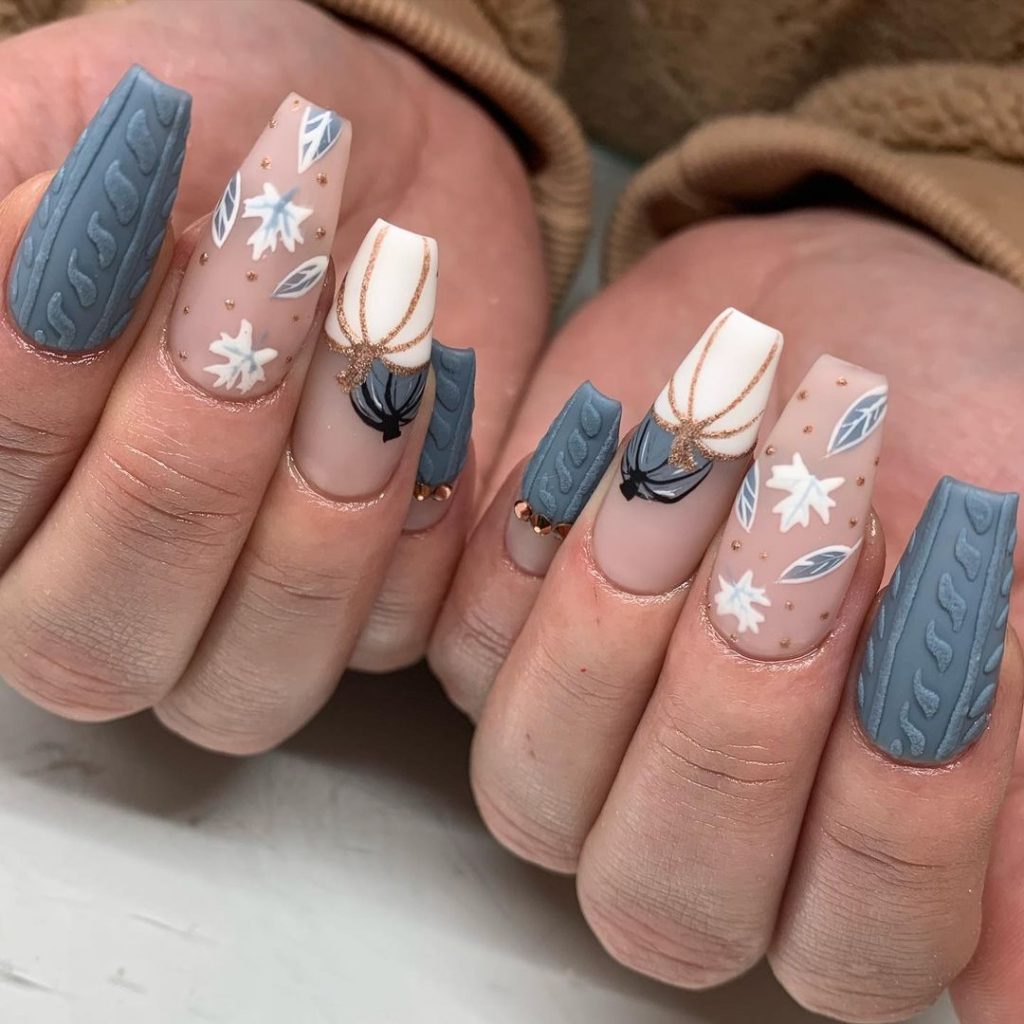 Photo credit: @earth.to.bree
Consumables:
Blue, beige and white nail polishes (e.g., “Bikini So Teeny” by Essie, “My Vampire is Buff” by OPI, “Purity” by Zoya)
3D nail gel for texture (e.g. Born Pretty 3D Sculpting Gel)
Gold nails with glitter and studs
Fine nail art brushes for added precision.
UV/LED curing lamp
DIY Instructions:
Apply a base coat to protect your nails.
Paint your nails with the blue and beige base colors, alternating on each nail.
Use 3D nail art gel to create cable weave patterns on selected nails.
Add leaf designs and gold accents using fine brushes and glitter.
Cure the design under UV/LED lamp.
Seal with a clear top coat to finish and protect the design.
Brown and nude plaid sweater nails
This nude and brown plaid sweater nail design combines warm, earthy tones that are perfect for fall. Subtle plaid patterns and cable knit textures create a cozy, chic look. The glossy finish on some nails adds a modern twist to this classic design.
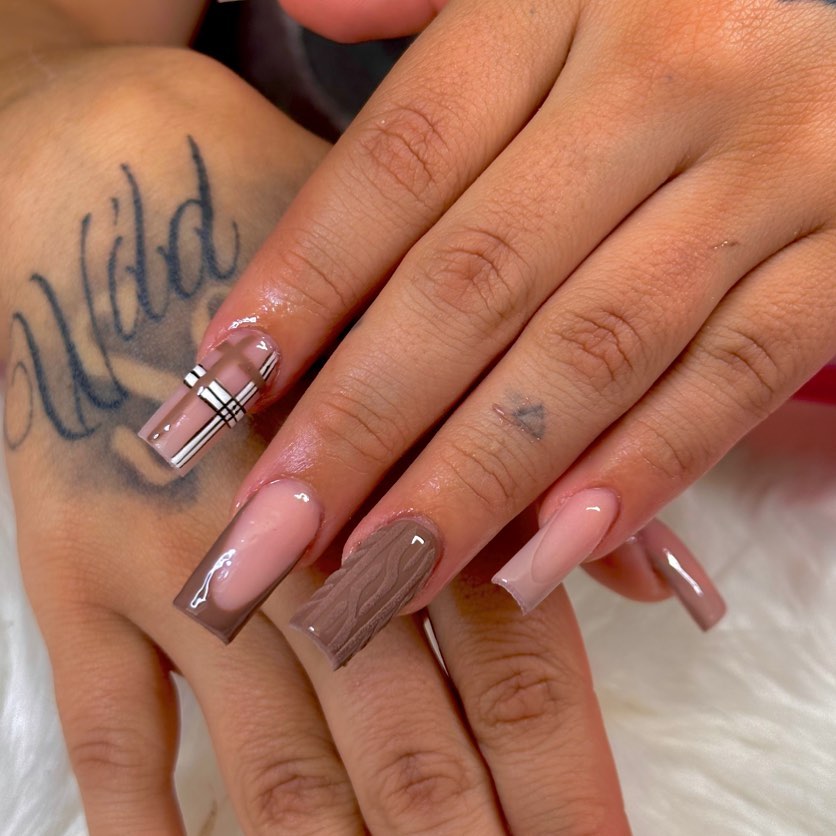 Photo credit: @nailzbylena_
Consumables:
Brown and nude nail polishes (e.g. OPI “Chocolate Moose”, Essie “Bare My Soul”)
3D nail gel for texture (e.g. Born Pretty 3D Sculpting Gel)
Fine nail art brushes for added precision.
Striping tape for clean lines
UV/LED curing lamp
DIY Instructions:
Start with a base coat to protect your nails.
Paint your nails with the brown and nude base colors, alternating on each nail.
Use striped tape to create checkered patterns and fill them in with brown polish.
Use 3D nail art gel to create cable weave patterns on selected nails.
Cure the design under UV/LED lamp.
Finish with a clear top coat to seal the design.
Purple and shiny sweater effect nails
These sweater nails in bright purple hues are a perfect combination of elegance and fun. Deep purple hues combined with glitter details and cable knit patterns create a festive and cozy look. The addition of plaid patterns adds a touch of sophistication to this vibrant design.
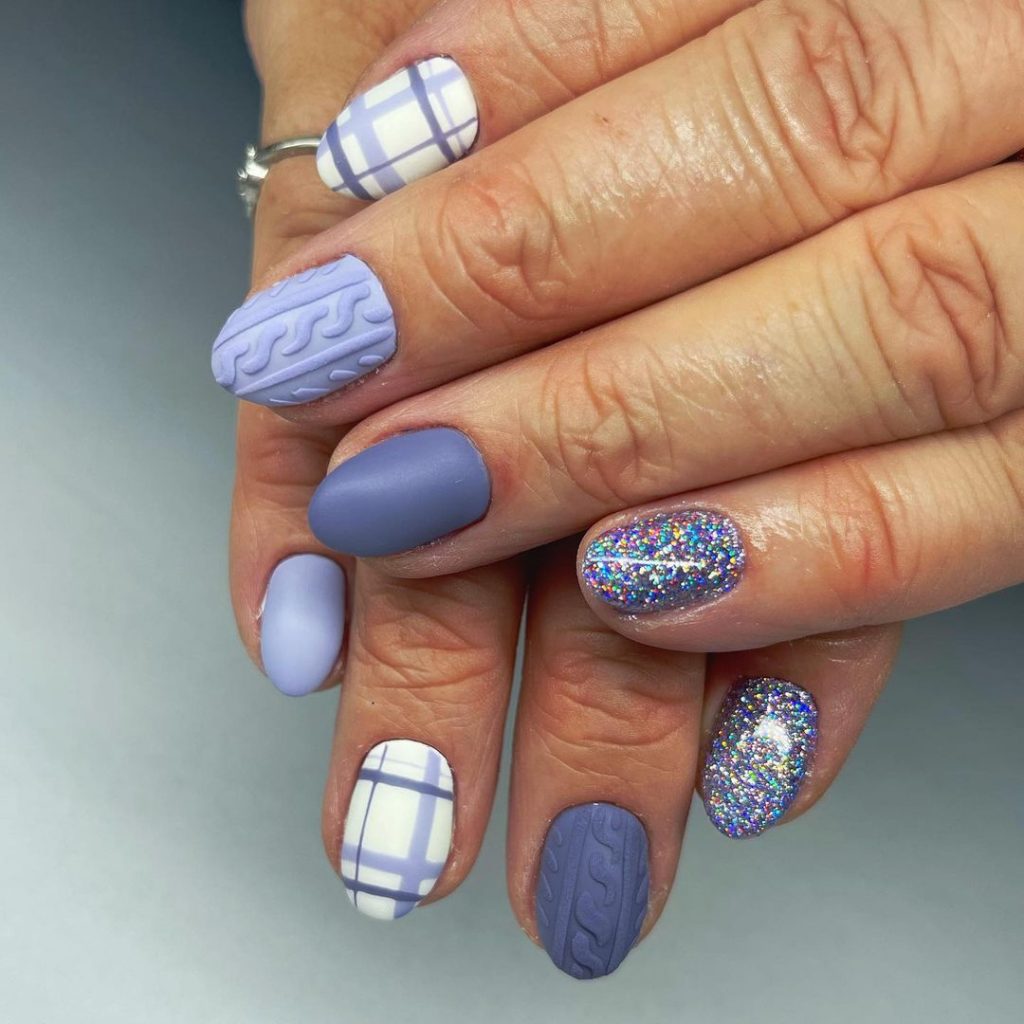 Photo credit: @nailsbyswayz
Consumables:
Purple and glitter nail polishes (e.g. Essie “Dressed to the Nineties,” China Glaze “Fairy Dust”)
3D nail gel for texture (e.g. Born Pretty 3D Sculpting Gel)
Fine nail art brushes for added precision.
UV/LED curing lamp
DIY Instructions:
Apply a base coat to protect your nails.
Paint your nails with the purple base colors and glitter, alternating on each nail.
Use 3D nail art gel to create cable weave patterns on selected nails.
Add checkered patterns using fine brushes and violet polish.
Cure the design under UV/LED lamp.
Seal with a clear top coat to finish and protect the design.
Green and gold pumpkin nails
Celebrate the harvest season with these green and gold pumpkin nails. Olive green hues paired with gold glitter accents and pumpkin designs make this manicure festive and fun. Cable knit patterns add cozy texture, perfect for fall.
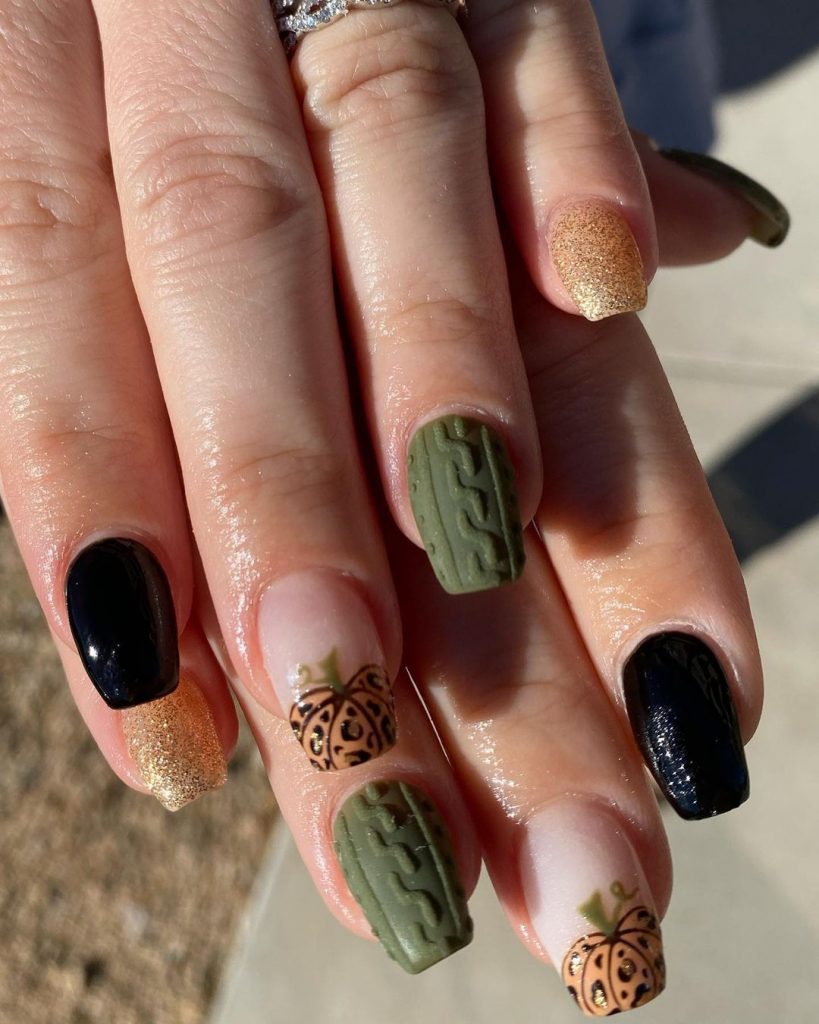 Photo credit: @honeydipped_byemma
Consumables:
Olive green, black and gold nail polishes (e.g. OPI “Suzi – The First Lady of Nails”, Essie “Licorice”, China Glaze “Mingle with Kringle”)
3D nail gel for texture (e.g. Born Pretty 3D Sculpting Gel)
Pumpkin nail decals
Fine glitter in gold
Dotting Tool and Fine Brush for Nail Art
UV/LED curing lamp
DIY Instructions:
Start with a base coat to protect your nails.
Paint your nails with the base colors olive green, black and nude, alternating on each nail.
Use 3D nail art gel to create cable weave patterns on selected nails.
Apply pumpkin decals and add gold glitter details for a festive touch.
Cure the design under UV/LED lamp.
Finish with a clear top coat to seal and protect the design.
Short nails with autumn floral design
These short floral nails combine earthy tones with delicate floral prints, perfect for a cozy autumn look. The combination of green, brown, orange and white tones with floral and cable knit designs creates a harmonious and charming manicure.
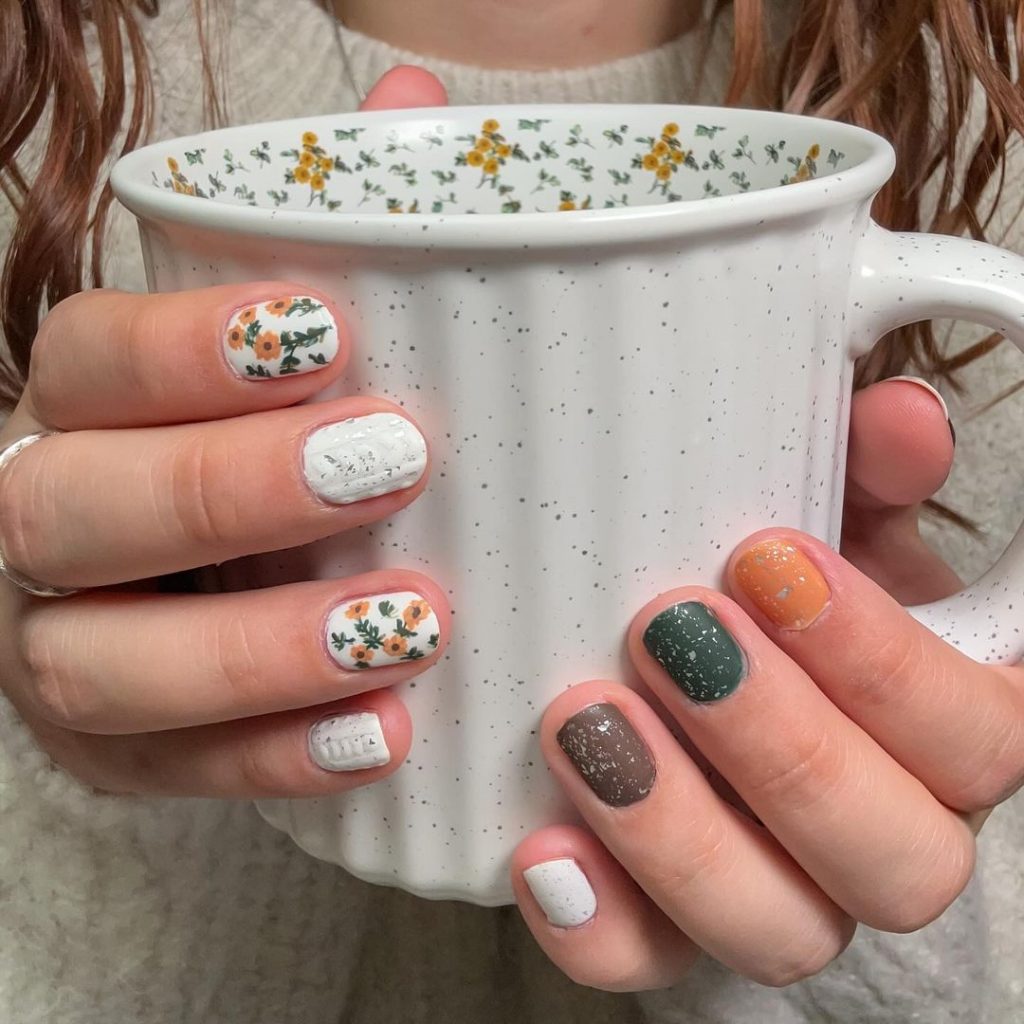 Photo credit: @myrznails
Consumables:
Green, brown, orange, and white nail polishes (e.g., OPI “Stay Off the Lawn,” Essie “Little Brown Dress,” OPI “It’s a Piazza Cake,” Zoya “Purity”)
3D nail gel for texture (e.g. Born Pretty 3D Sculpting Gel)
Floral nail art decals
Fine nail art brushes for added precision.
UV/LED curing lamp
DIY Instructions:
Apply a base coat to protect your nails.
Paint your nails with the base colors green, brown, orange and white, alternating on each nail.
Use 3D nail art gel to create cable weave patterns on selected nails.
Apply floral decals and use fine brushes to add details.
Cure the design under UV/LED lamp.
Seal with a clear top coat to finish and protect the design.
Earthy tones and sweater patterns
This nail design combines warm, earthy tones like peach, brown, and terracotta with adorable floral and sweater prints. The mix of solid colors and intricate designs creates a cozy and inviting style, perfect for fall. The almond shape adds elegance, while the 3D knit texture provides a touch of comfort.
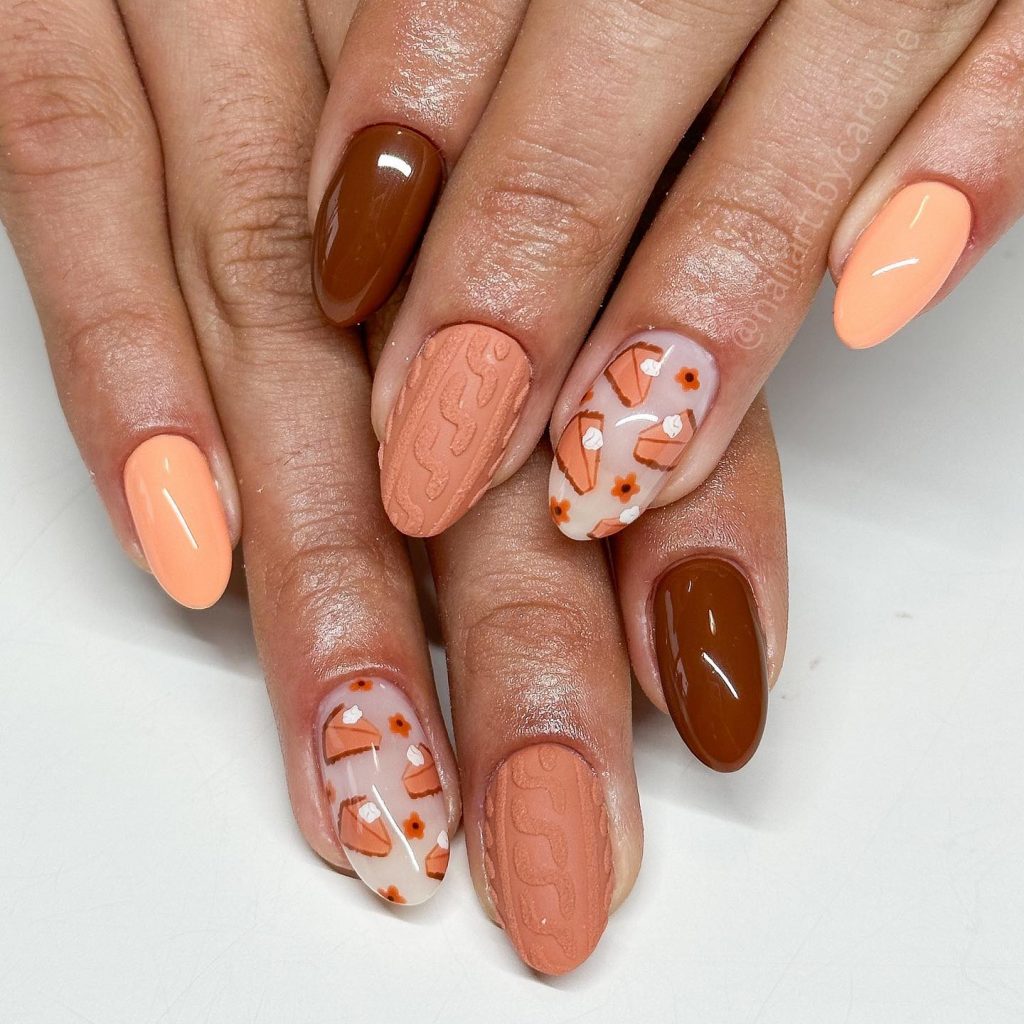 Photo credit: @nailart.bycaroline
Consumables:
Peach, brown and terracotta nail polishes (e.g. OPI “Sweet Caramel Sunday”, Essie “Chocolate Kisses”)
3D nail gel for texture (e.g. Born Pretty 3D Sculpting Gel)
Fine nail art brushes for added precision.
UV/LED curing lamp
DIY Instructions:
Apply a base coat to protect your nails.
Paint your nails with the base colors peach, brown and terracotta, alternating on each nail.
Use 3D nail art gel to create cable weave patterns on selected nails.
Add floral designs using fine brushes for detailed work.
Cure the design under UV/LED lamp.
Seal with a clear top coat to finish and protect the design.
Cat and sweater with short nails
These short nails feature a charming combination of cat faces and sweater patterns in warm, neutral tones. The combination of beige, brown, and tan colors with cute cat designs and 3D knit textures makes this manicure fun and cozy, perfect for cat lovers in the fall.
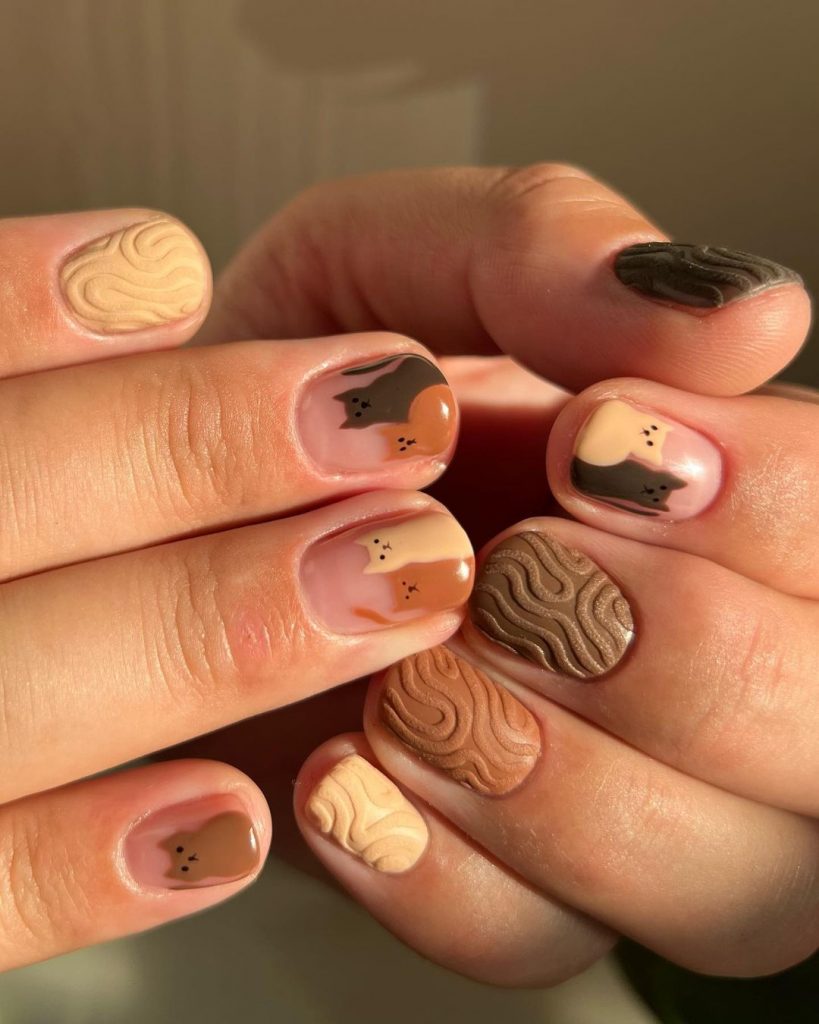 Photo credit: @snakebellynails
Consumables:
Beige, brown, and tan nail polishes (e.g., Essie’s “Sand Tropez” or OPI’s “Espresso Your Inner Self”)
3D nail gel for texture (e.g. Born Pretty 3D Sculpting Gel)
Fine nail art brushes for added precision.
UV/LED curing lamp
DIY Instructions:
Apply a base coat to protect your nails.
Paint your nails with the base colors beige, brown and tan, alternating on each nail.
Use 3D nail art gel to create cable weave patterns on selected nails.
Draw cat faces using fine brushes for detailed work.
Cure the design under UV/LED lamp.
Seal with a clear top coat to finish and protect the design.
French nails with marble effect
This chic design combines a marble French tip with 3D sweater patterns, creating a sophisticated look. The neutral tones and glossy finish add a touch of luxury to the cozy cable knit texture, making this manicure perfect for any chic fall outfit.
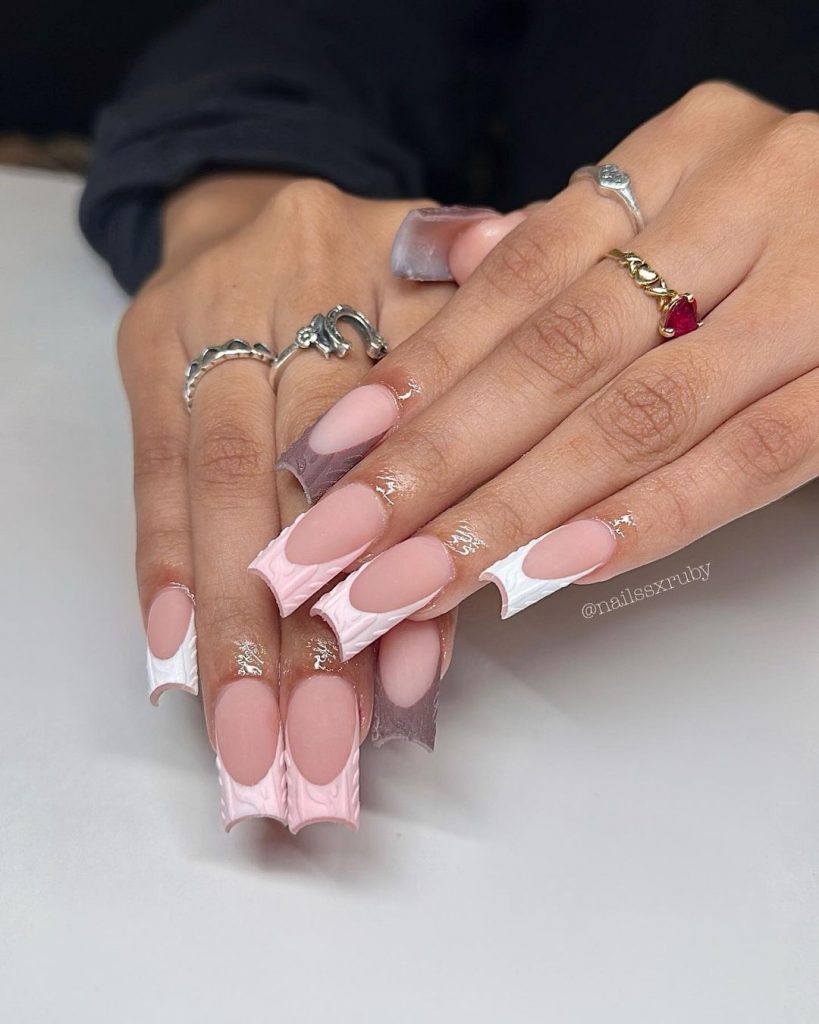 Photo credit: @nailssxruby
Consumables:
Nail polishes with nude and marble effects (e.g. OPI “Bubble Bath”, Sally Hansen “Marble-ous”)
3D nail gel for texture (e.g. Born Pretty 3D Sculpting Gel)
Fine nail art brushes for added precision.
UV/LED curing lamp
DIY Instructions:
Apply a base coat to protect your nails.
Paint your nails with a nude base color.
Create a marble effect on your French tips using marble effect nail polish.
Use 3D nail art gel to create cable weave patterns on selected nails.
Cure the design under UV/LED lamp.
Finish with a clear top coat to seal and protect the design.
Nails with a sweater design with nude flowers
These nude floral print nails combine delicate floral patterns with cozy cable knit textures. Soft nude tones and subtle floral designs create a sophisticated and feminine look, perfect for any fall occasion. The addition of small rhinestones adds a touch of sparkle and elegance.
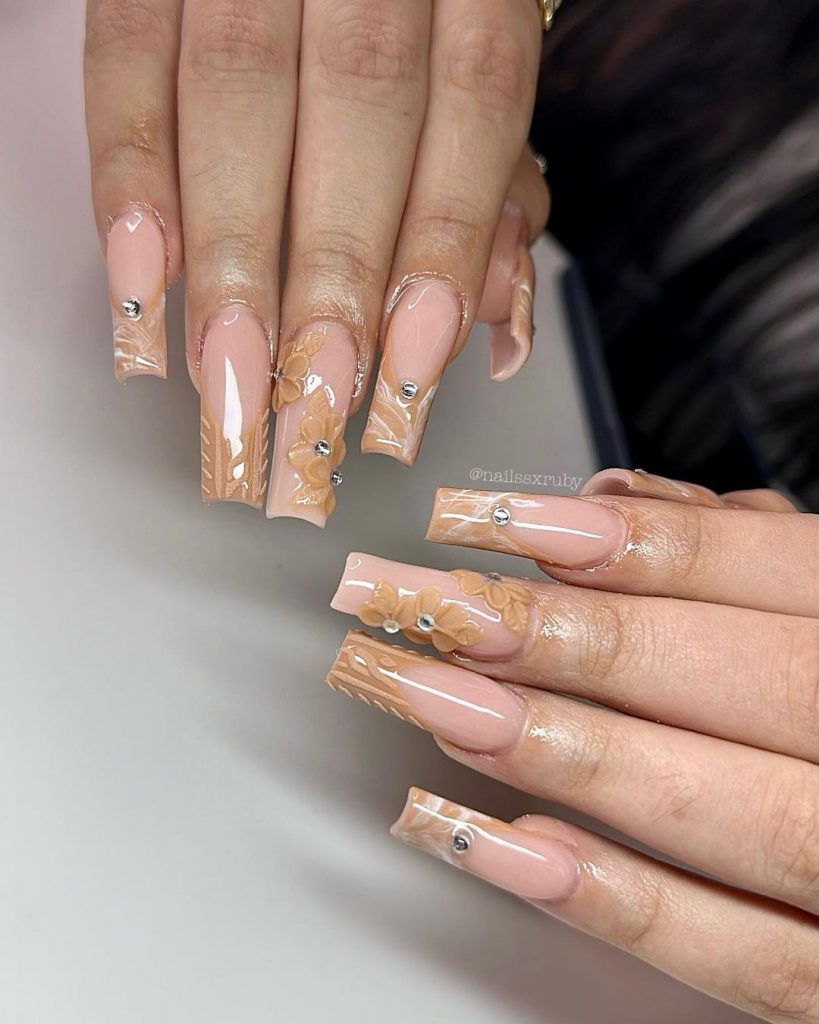 Photo credit: @nailssxruby
Consumables:
Nude nail polish (e.g. OPI “Samoan Sand”)
3D nail gel for texture (e.g. Born Pretty 3D Sculpting Gel)
Floral nail art decals
Small rhinestones
Fine nail art brushes for added precision.
UV/LED curing lamp
DIY Instructions:
Apply a base coat to protect your nails.
Paint your nails with a nude base color.
Use 3D nail art gel to create cable weave patterns on selected nails.
Apply floral decals and small rhinestones to add detail.
Cure the design under UV/LED lamp.
Seal with a clear top coat to finish and protect the design.
Neutral Sweater Nails
These neutral jersey nails feature a classic look with a focus on 3D knit textures. Nude hues and cable knit patterns create a clean and cozy look, perfect for those who love a minimalist yet chic manicure. The glossy finish adds a touch of sophistication.
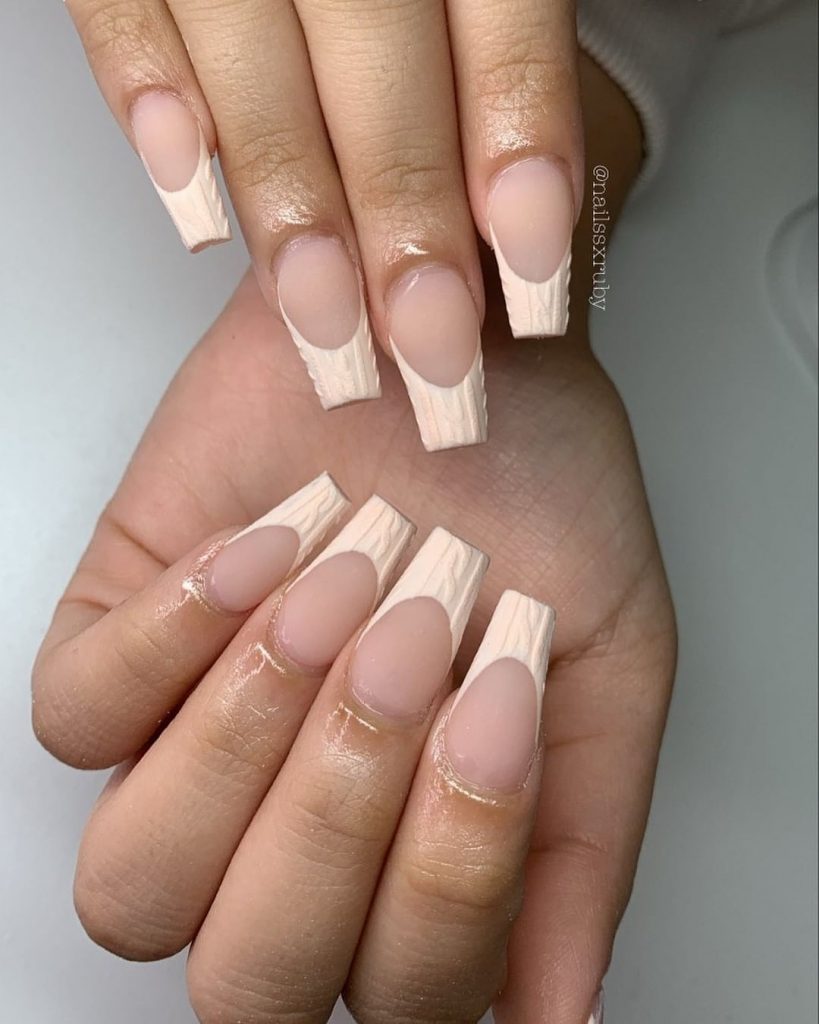 Photo credit: @nailssxruby
Consumables:
Nude nail polish (e.g. Essie “Topless & Barefoot”)
3D nail gel for texture (e.g. Born Pretty 3D Sculpting Gel)
Fine nail art brushes for added precision.
UV/LED curing lamp
DIY Instructions:
Apply a base coat to protect your nails.
Paint your nails with a nude base color.
Use 3D nail art gel to create cable weave patterns on selected nails.
Cure the design under UV/LED lamp.
Finish with a clear top coat to seal and protect the design.
